How to Setup Pritunl VPN on Ubuntu
A complete guide to deploying a self-hosted VPN server using Pritunl on Ubuntu — secure, scalable, and easy to manage.
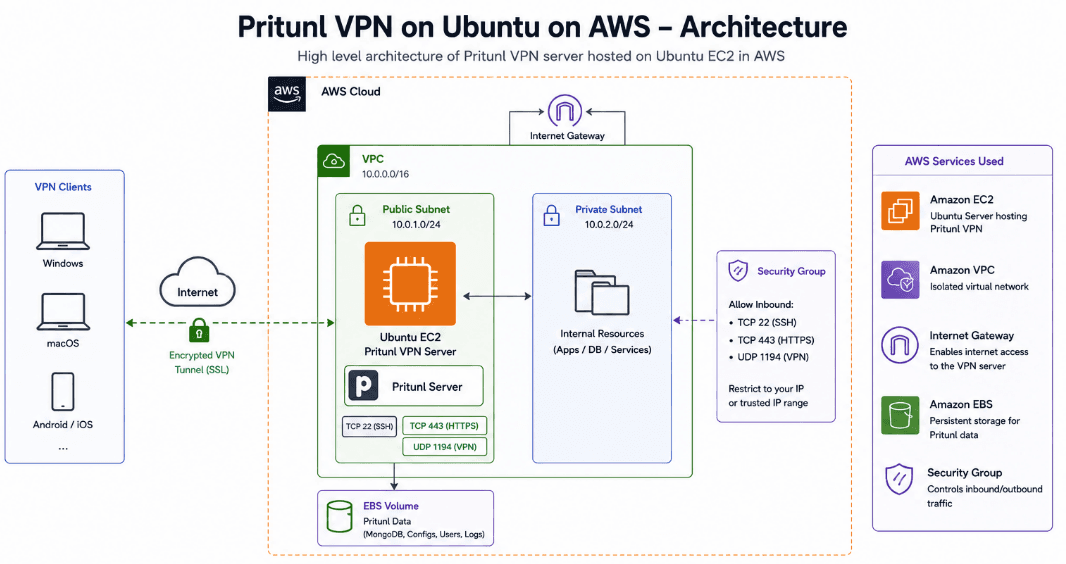
What is Pritunl?
Pritunl is an open-source enterprise VPN server built on OpenVPN and WireGuard. It provides a web-based management interface, multi-user support, and integrates with MongoDB for configuration storage.
Open Source
Free to use with full source code available. Enterprise features available via subscription.
Web UI
Manage users, organizations, servers, and routes through a clean dashboard.
Multi-Protocol
Supports OpenVPN and WireGuard with seamless switching between protocols.
Prerequisites
- ▹Ubuntu 22.04 or 24.04 LTS server (EC2, DigitalOcean, etc.)
- ▹Root or sudo access
- ▹Minimum 1 GB RAM, 1 vCPU
- ▹Public IP address
- ▹Ports open: 443 (HTTPS), 80 (HTTP), 1194/UDP (OpenVPN)
Step 1: Install MongoDB
Pritunl uses MongoDB to store all configuration, user data, and server settings.
# Import MongoDB GPG key
curl -fsSL https://www.mongodb.org/static/pgp/server-7.0.asc | sudo gpg --dearmor -o /usr/share/keyrings/mongodb-server-7.0.gpg# Add MongoDB repository (Ubuntu 22.04)
echo "deb [ signed-by=/usr/share/keyrings/mongodb-server-7.0.gpg ] https://repo.mongodb.org/apt/ubuntu jammy/mongodb-org/7.0 multiverse" | sudo tee /etc/apt/sources.list.d/mongodb-org-7.0.list# Install MongoDB
sudo apt-get update
sudo apt-get install -y mongodb-org
# Start and enable MongoDB
sudo systemctl start mongod
sudo systemctl enable mongod
sudo systemctl status mongod
Step 2: Install Pritunl
# Add Pritunl repository key
sudo tee /etc/apt/sources.list.d/pritunl.list << EOF
deb https://repo.pritunl.com/stable/apt jammy main
EOF
# Import Pritunl GPG key
sudo apt-key adv --keyserver hkp://keyserver.ubuntu.com --recv 7568D9BB55442D120CF7B1ACA2FE45BD7C4E23F1# Install Pritunl
sudo apt-get update
sudo apt-get install -y pritunl
# Start and enable Pritunl
sudo systemctl start pritunl
sudo systemctl enable pritunl
sudo systemctl status pritunl
Step 3: Initial Configuration
Get the setup key and default credentials to access the web UI.
# Get the setup key
sudo pritunl setup-key# Get default login credentials
sudo pritunl default-passwordNext: Open your browser and navigate to https://your-server-ip — accept the self-signed certificate warning.
Step 4: Web UI Setup
Enter Setup Key
Paste the setup key from the terminal. Leave the MongoDB URI as default (mongodb://localhost:27017/pritunl).
Login
Use the default credentials from pritunl default-password. Default is usually pritunl / pritunl or a generated password.
Change Admin Password
Immediately change the default password under Settings. Set your public IP or domain as the server address.
Step 5: Create Organization & Users
Create Organization
Go to Users tab → Click Add Organization→ Name it (e.g., "Engineering").
Add Users
Click Add User → Enter name and PIN (optional) → Select the organization → Save. Each user gets their own VPN profile.
Step 6: Create VPN Server
Add Server
Go to Servers tab → Click Add Server
- • Name: Give it a name (e.g., "production-vpn")
- • Port: 1194 (default OpenVPN port)
- • Protocol: UDP (recommended for performance)
- • Virtual Network: 10.10.0.0/24 (or your preferred CIDR)
Attach Organization
Click Attach Organization on the server → Select the organization you created → This allows users in that org to connect.
Start Server
Click Start Server. The VPN is now running and accepting connections.
Step 7: Connect Clients
Download the user profile and import it into the Pritunl client or any OpenVPN-compatible client.
# Download Pritunl Client
# macOS: brew install --cask pritunl
# Ubuntu: sudo apt-get install pritunl-client-gtk
# Windows: Download from https://client.pritunl.com
Download Profile
In the Pritunl web UI → Users tab → Click the download icon next to the user → Download the .tar profile file.
Import & Connect
Open Pritunl Client → Click Import Profile → Select the downloaded .tar file → Click Connect.
Step 8: Firewall Configuration
Ensure the required ports are open on both UFW and your cloud provider's security group.
# UFW rules
sudo ufw allow 80/tcp
sudo ufw allow 443/tcp
sudo ufw allow 1194/udp
sudo ufw enable
sudo ufw status
AWS Security Group: Add inbound rules for TCP 443, TCP 80, and UDP 1194 from 0.0.0.0/0 (or restrict to your IP ranges).
Optional: SSL with Let's Encrypt
If you have a domain pointed to your server, enable free SSL.
Via Web UI
Go to Settings → Set your domain in Lets Encrypt Domain → Click Save. Pritunl automatically provisions and renews the certificate.
# Or via CLI
sudo pritunl set app.server_cert ""
sudo pritunl set app.server_key ""
sudo pritunl set app.acme_domain your-domain.com
Troubleshooting
Can't access web UI?
Check that Pritunl is running (systemctl status pritunl) and port 443 is open in your firewall/security group.
Client can't connect?
Verify UDP 1194 is open. Check server logs: sudo journalctl -u pritunl -f. Ensure the server is started in the web UI.
MongoDB connection error?
Ensure MongoDB is running: systemctl status mongod. Restart if needed: sudo systemctl restart mongod.
Summary
- Install MongoDB 7.0
- Install Pritunl from official repo
- Get setup key and default password
- Configure via web UI (https://your-ip)
- Create organization and users
- Create and start VPN server
- Download profile and connect via client
- Configure firewall rules
- (Optional) Enable Let's Encrypt SSL